What you’re going to learn
I’m going to show you how to deploy your static Astro site to AWS S3, add CloudFront CDN and attach your Route 53 domain with custom SSL certificate.
Some assumptions:
- Having an AWS account
- Basic knowledge about Terraform
- Basic knowledge about AWS services used here
- Having a Route 53 domain
I’ll explain only the interesting parts and I’ll be skipping over some basics.
Everything shown here and required for the setup to work is in this repo i case you want to look just at the code.
Both CloudFront and Route 53 are not required for all that to work, but it’s a nice package when it’s all used together.
If you don’t want to use a custom domain and CDN you’d have to skip some of the Terraform and pipelines setup by yourself or check out this branch with just S3 set up.
Astro site
The Astro site itself is not really important at this moment, so I’m using auto-generated one.
It doesn’t even have to be an Astro site, just any static site framework that on build generates index.html files.
So let’s create the simplest Astro website:
npm create astro@latestgive your project any name you want and you can select all the defaults options that Astro template has.
Then you can run npm run dev just to check if the website starts.
Once that’s taken care of, we can move to more interesting parts.
Architecture overview
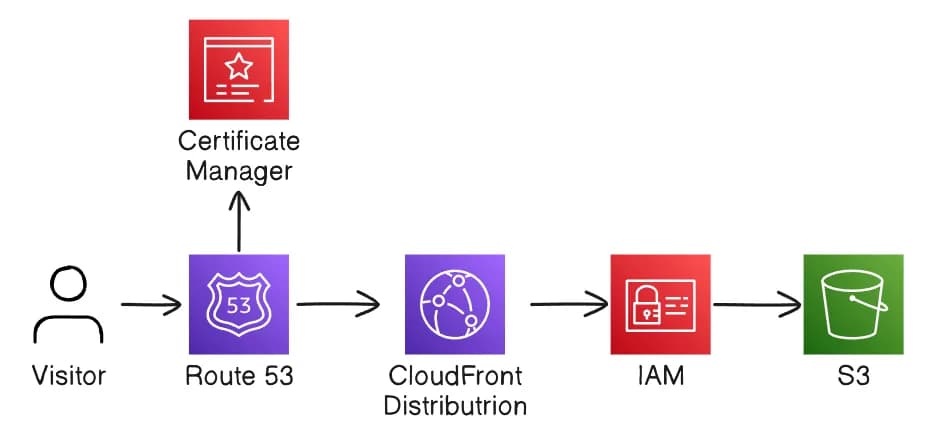
We will be using 5 AWS services to host this website:
- Route 53 - for the domain
- Certificate Manager - for custom SSL certificate for the domain
- CloudFront - as CDN to make the website load faster
- S3 - to store static website files
- IAM - to allow CloudFront to access private S3 bucket
Here is how those services will work together:
With the overview in mind, let’s move onto some of the terraform configurations.
Terraform
Let’s look at the Terraform configuration that sits in infra folder.
It’s generally a good idea to lock version of your dependencies, in this case AWS provider is locked to version 5.45.0.
Two providers are needed, because ACM certificates have to be created in us-east-1 region, while all other resources can be created in any other region.
terraform {
  required_providers {
    aws = {
      source = "hashicorp/aws"
      version = "5.45.0"
    }
  }
}

# your default provider
provider "aws" {
  region  = "eu-west-1"
}

# provider needed for SSL cert
provider "aws" {
  region  = "us-east-1"
  alias   = "us-east-1"
}
Create a terraform.tfvars file to have a single place with parameters:
To use this terraform setup you have to provide some input values. Here is an example of terraform.tfvars file:
# terraform.tfvars
dns_zone_name       = "example.com"
main_domain_name    = "example.com"
domain_aliases      = ["another.example.com"]
website_bucket_name = "example-bucket"
aws_region          = "eu-west-1"
Since this file doesn’t contain any secrets or credentials it can be commited to the repository, especially for simplicity.
S3 bucket
As for the S3 bucket, we want it to be private. This will prevent the bucket from generating additional costs as website files will be only accessible through CloudFront.
resource "aws_s3_bucket_ownership_controls" "website" {
  bucket = aws_s3_bucket.website.id
  rule {
    object_ownership = "BucketOwnerPreferred"
  }
}

resource "aws_s3_bucket_public_access_block" "website" {
  bucket = aws_s3_bucket.website.id

  block_public_acls       = true
  block_public_policy     = true
  ignore_public_acls      = true
  restrict_public_buckets = true
}

resource "aws_s3_bucket_acl" "website" {
  bucket = aws_s3_bucket.website.id
  acl    = "private"
}
CloudFront will be able to access this S3 bucket only if there is IAM policy that will explicitly do so.
Within this policy we specify that it should apply to entire bucket with bucket and bucket/*:
resource "aws_s3_bucket_policy" "policy" {
  bucket = aws_s3_bucket.website.id
  policy = data.aws_iam_policy_document.cloudfront_access.json
}

data "aws_iam_policy_document" "cloudfront_access" {
  statement {
    sid    = "AllowCloudFrontS3Access"
    effect = "Allow"

    resources = [
      "${aws_s3_bucket.website.arn}",
      "${aws_s3_bucket.website.arn}/*",
    ]

    actions = ["s3:GetObject"]

    principals {
      type = "Service"
      identifiers = ["cloudfront.amazonaws.com"]
    }
  }
}
CloudFront
In the settings for CloudFront distribution it’s worth to mention option to set what part of the CDN network will be used (from only EU and NA to all available regions) as well as allow or deny access from countries recognised by CloudFront:
resource "aws_cloudfront_distribution" "website" {
  # skipped part of the configuration
  price_class = "PriceClass_All" # or PriceClass_100 or PriceClass_200

  restrictions {
    geo_restriction {
      restriction_type = "none"
      # restriction_type = "whitelist" # or "blacklist"
      # locations        = ["US", "CA", "GB", "DE"]
    }
  }
}
another important setup for this website is custom CloudFront function that will append /index.html to requests going from CloudFront to S3 bucket. Without it any subpages will not be reachable by the end user.
Function can be added in terraform:
resource "aws_cloudfront_distribution" "website" {
  # skipped part of the configuration
  function_association {
    event_type = "viewer-request"
    function_arn = aws_cloudfront_function.index.arn
  }
}

resource "aws_cloudfront_function" "index" {
  name = "index"
  runtime = "cloudfront-js-2.0"
  code = file("${path.module}/index.js")
}
with the function code in index.js file:
async function handler(event) {
  const request = event.request;
  const uri = request.uri;

  if (uri.endsWith("/")) {
    request.uri += "index.html";
  } else if (!uri.includes(".")) {
    request.uri += "/index.html";
  }

  return request;
}
terraform will handle code upload and binding to CloudFront distribution.
Deployment pipeline
For all I care you can run terraform apply and then s3 sync by yourself.
If that’s not fancy enough for you, then let’s go over a basic pipeline that’s going to do all that for you.
Main steps that you want to take each time changes were commited is:
- Plan terraform changes and apply if the are any changes
- Build Astro site
- Publish build artifacts to S3 bucket
- Create a CloudFront Cache invalidation
I don’t think i need to show here the entire yaml file with all the steps.
Let’s focus on what need to be done in those crucial steps:
terraform applyif there are any changes to the infrastructurenpm run buildto generate static website filesaws s3 syncto upload those files to S3 bucketaws cloudfront create-invalidationto invalidate old files in existing cache
Costs
It’s worth to remember that this setup is not free.
There’s flat $0.50 for Route 53 domain and rest of the charges scale with amount of requests.
If you do not expect to be exceeding million or so requests per month then you don’t have to worry about paying more than $1 per month for this website.
Still, it’s a good idea to setup budget limits as well as alerts that will be triggered once certain bill amount is reached.
Summary
This setup gives you a quick and easy way to deploy static Astro websites to AWS using Terraform.
Remember that repo with everything required is available here.
Also, a branch with simplified setup that skips CloudFront, Route53 and ACM is available on the branch here.